Chiropractic Therapeutic Exercise
25 Simple Chiropractic Exercises at Home (To Help With Pain)
Many different chiropractic exercises can be done at home, and it is crucial to find the ones that work best for you.
To help you get started, here are 25 simple stretches and chiropractic exercises at home for you to try.
These at-home exercises can help with pain and discomfort and are a great way to improve your overall spinal health.
So why not give them a try?
Table of Contents
- How Chiropractic Exercises Help Improve Spinal Health
- 25 Chiropractic Stretches and Exercises
- Cat-Cow Stretch
- McKenzie Prone Press-up
- Seated Glute (Piriformis) Stretch
- Pelvic Tilt
- Prayer Stretch
- Lying Glute Stretch
- Supine Bridge
- Bird Dog
- Lateral Neck Tilt
- Posterior Shoulder Roll
- Arm Prayer Stretch
- Psoas Chair Stretch
- Prone TYI Exercise
- Upper Trapezius Stretch
- Scalene Stretch
- Pec Stretch
- Lumbar Rotation
- Seated Spinal Twist
- Knee to Chest
- Corner Stretch
- Shoulder Shrugs
- McKenzie Neck Flexion
- Double Leg Lifts
- Partial Sit-ups
- Standing Hamstring Curl
- How Often Should You Do These Exercises?
- FAQs About Chiropractic Care
How Chiropractic Exercises Help Improve Spinal Health
Chiropractic exercises help to improve range of motion, flexibility, and strength in the low to mid back or other target spine area.
On top of that, they also help to promote better posture and alignment.
One of the benefits of chiropractic exercises is that they can help to keep the body pain-free.
They can also help to improve circulation and reduce inflammation and prevent future injuries to the spine.
25 Chiropractic Stretches and Exercises
The following stretches and movements are some of the best exercises for at home.
Below is a YouTube playlist with a video walkthrough for each exercise.
- Cat-Cow Stretch
The cat-cow stretch is a yoga move that helps to warm up your spine and increase flexibility and range of motion.
It’s also said to be helpful for relieving back pain.
- To do the cat-cow stretch, you’ll need to start on all fours on the floor. Hands shoulder width apart.
- Then, arch your back up like a cat, making sure to keep your head and neck in line with your spine. Hold for a few seconds.
- Then tuck your chin and round your back like a cow.
- McKenzie Prone Press-up
The McKenzie Prone Press-up is a variation of the traditional press-up that is specifically designed to target the abdominal muscles and alleviate lower back pain.
This exercise is named after physical therapist Robin McKenzie, who developed it as a treatment for patients with back pain.
- The McKenzie Prone Press-up is performed by lying flat on the floor, facing down.
- Keep your legs against the floor and press up until your elbows are slightly bent and your torso is elevated.
- From there, you lower your body back down to the ground, making sure to keep your elbows close to your sides.
- Perform for 5-10 reps
- Seated Glute (Piriformis) Stretch
This Glute Stretch is used to target the piriformis muscle.
This muscle is located in the gluteal region and can often become tight due to overuse or incorrect posture.
When this muscle is tight, it can cause pain in the buttocks and hip region.
This Stretch can help to relieve this pain by lengthening the muscle.
- To perform the Piriformis Stretch, begin by sitting on a chair.
- Place your right ankle on your left knee.
- Use your right hand to gently press down on your right knee to deepen the stretch.
- From here, engage your core and lean your upper body over your legs.
- Hold for 30 seconds and then switch sides.
- Pelvic Tilt
The pelvic tilt is a simple way to strengthen your abdominal muscles.
This makes it an especially good exercise to fix lower back pain.
- To do it, lie flat on your back on the floor, with your feet flat on the floor and your knees bent.
- Place your hands on your abdomen, and use your abdominal muscles to pull your belly button toward your spine.
- Hold for five seconds, then release. Repeat 10 times.
- Prayer Stretch
The prayer stretch is a yoga pose that helps you open your chest, shoulders, and back.
It’s named for the prayer position that it resembles.
To do the prayer stretch:
- Start by sitting with your buttocks over your heels.
- Raise your arms in front of you.
- Slowly lean forward from the waist, keeping your head and body straight.
- Place your palms on the floor in front of you, fingers pointing forward.
- Hold it here until you get a good stretch.
- Use your arms to push your body back up to the starting position.
- Repeat this several times.
- Lying Glute Stretch
The lying glute stretch is a stretch that helps to lengthen the glutes.
- For this one start flat on your back and bring your left foot over your right leg.
- Then lift your legs and grab behind the right knee with both hands.
- Pull towards your chest until you feel a gentle stretch.
- Stretch for up to 30 seconds and switch sides.
- Supine Bridge
The supine bridge is an exercise that works the glutes, hamstrings, and abdominals.
It can be done with or without weight.
- To do it, start flat on your back with your feet on the ground, your legs bent, and your hands by your sides.
- Drive your heels into the ground, and lift your torso and upper legs into the air.
- Extend your hips until your thighs and torso are in line with each other
- Hold for two seconds. Reverse the motion, and repeat.
- Bird Dog
This exercise is a simple, but effective, core workout.
It targets the abdominal muscles, as well as the glutes and hamstrings.
If you have pain in the lower back be sure to try this one!
- To do this exercise, start on all fours, with your hands below your shoulders and your knees below your hips.
- Extend one arm and one leg out straight, hold for a few seconds, and then return to start.
- Repeat with the other arm and leg.
- Lateral Neck Tilt
The lateral neck tilt is a position of the neck in which the head is tilted to one side.
This position can be used to improve the range of motion and relieve neck pain.
How is the lateral neck tilt performed?
- You will need to start by sitting or standing in a comfortable position.
- Next, slowly tilt your head to one side until you feel a stretch in the side of your neck.
- Hold this position for 20-30 seconds and then repeat on the other side.
- Posterior Shoulder Roll
The posterior shoulder roll is a yoga exercise that helps to reduce strain on the neck and shoulders.
This exercise can be performed sitting or standing and is a great way to release tension from the upper body.
- To perform the posterior shoulder roll, start with your body straight and your shoulders relaxed.
- From here, slowly roll your shoulder blades back and down, then rotate them in a circular motion.
- Repeat the movement for 30-60 seconds.
- Arm Prayer Stretch
The arm prayer stretch is a simple exercise that can help with carpal tunnel syndrome and other hand and arm problems.
- It involves extending the hands and arms out in front of you, then holding the hands together as if you were praying.
- Flair your elbows out and slowly lower your hands while pressing them together.
- Once the stretch is complete, move your hands back up before pulling them apart.
- You can hold this position for a few seconds, or work up to a minute. repeat 3-5 times.
- This stretch also works the shoulders and forearms.
- Psoas Chair Stretch
Sitting all day is bad for your back and can lead to tightness in the hip muscles, specifically the psoas.
The Psoas chair stretch is a great way to counteract the negative effects of sitting all day.
It’s simple to do and only takes a few minutes.
With it, you will loosen up tight hips and improve spine stability.
You can even do it without a chair if you prefer.
How to do the Psoas Chair Stretch:
- Start by standing in front of a chair.
- Put your left leg on the chair.
- Tilt your pelvis slightly inwards and then contract your glute muscles.
- Then lean your body forward until your right hip is stretched.
- Maintain the stretched position for up to 1 minute before switching to the left side.
- Prone TYI Exercise
The Prone TYI Exercise is a great way to improve your shoulder strength and stability.
This exercise can also be used to improve your posture.
- Perform this exercise by lying face down on the floor.
- Have your palms facing down by your sides with your arms straightened.
- You then raise your arms off the ground by retracting your shoulder blades.
- Hold the position and then repeat.
- Be sure to keep your stomach and head rested on the floor during this entire movement.
- Upper Trapezius Stretch
The Upper Trapezius Stretch targets the upper trap muscles.
Stretching these muscles will help mitigate tightness in the neck and shoulders.
- To perform the stretch, sit with your feet hip-width apart.
- Then hold onto the edge of the chair or table with your left hand.
- Slightly lean your body away from your left hand.
- While looking straight forward, tilt your head sideways towards the right shoulder.
- Hold for 30 seconds and switch.
- Scalene Stretch
The scalene stretch helps to open up the chest and neck.
It is a great pose to do if you are feeling congested or have tension in the neck muscle.
- To do the scalene stretch, you will need to sit or stand with your feet hip-width apart.
- Reach your right arm out and hold onto something secure.
- Look upwards and bend your head sideways towards the left.
- Once the stretch is complete, release and switch sides.
- Pec Stretch
The Pec or chest Stretch will help open up the chest muscles and alleviate shoulder pain.
- This stretch can be performed either standing or seated.
- Extend your hands behind your back and clasp them together.
- Push them downwards and outwards while simultaneously sticking your chest forward.
- Maintain this position for roughly 30 seconds then release.
- Lumbar Rotation
The Lumbar Rotation Stretch targets the lumbar spine and glutes.
It helps to improve flexibility and range of motion in these areas.
- It is performed by lying on your back with your knees bent and feet facedown on the ground.
- Then, slowly straighten the left leg.
- Lift your right knee and grasp it with your left arm.
- Begin to rotate the right knee sideways and over the left.
- Reach straight out with your right hand while looking in that same direction.
- Hold for 20-30 seconds before switching sides.
- Seated Spinal Twist
The seated spinal twist helps to improve spinal flexibility and range of motion.
It also helps to massage the internal organs, improving digestion.
How to do the Seated Spinal Twist:
- Sit on the floor with your legs extended in front of you.
- Bend your right leg and place your foot flat on the floor near your left hip.
- Place your right hand on the floor behind you.
- With your left hand, take hold of your right knee and pull it across your body towards the left.
- Look over your right shoulder as you do this for a deeper twist.
- Hold this position for 30 seconds to 1 minute, then repeat on the opposite side.
The Spinal Twist also:
- Stretches the muscles and ligaments around the spine.
- Relieves tension headaches and back pain.
- Knee to Chest
The knee-to-chest exercise is a lower body movement that primarily targets the glutes, hamstrings, and SI joint.
- To begin you will first want to lie down on your back.
- Next, pull one knee up to your chest and extend the other leg out and hold this position throughout.
- Now, slowly move your knee away from your chest with light effort, while holding the bottom of your knee with your hands.
- As you do this, take deep breaths in and as you push your knee out, breathe out.
- Push for 5 seconds and switch legs.
- Corner Stretch
The corner stretch helps open up the chest and shoulders to improve upright posture.
How to do the corner stretch:
- Stand in a corner or doorway with your elbows at shoulder height and your palms flat against the walls.
- Step forward with the right foot, keeping your heel on the ground and your toes pointing forward.
- Lean forward until you feel a stretch in your chest and shoulders.
- Hold it here for 30 seconds to 1 minute.
- Shoulder Shrugs
The shoulder shrug is a weight training exercise in which the shoulders are raised as high as possible and then lowered to the original position.
It is mainly used to build the trapezius muscle.
The exercise can also be performed using bodyweight or resistance bands.
The trap is a three-headed muscle that runs from the base of the neck to the middle of the back.
It is responsible for moving, stabilizing, and supporting the shoulder girdle.
- Start the exercise by inhaling and raising your shoulders as high as possible. If you are using resistance bands, loop the band around your wrists and anchor it under your feet.
- Hold the contraction at the top for a count of one before slowly releasing your shoulders back down to the starting position. Breathe out during this phase.
- Make sure to keep your head and neck in a neutral position throughout the exercise.
- Do not roll your shoulders forward or backward.
- Also, avoid arching your lower back as this can put unnecessary stress on your spine.
- McKenzie Neck Flexion
The McKenzie Flexion is one of the neck exercises that helps to stretch and strengthen the muscles surrounding your cervical spine.
It can also improve flexibility and range of motion and can help alleviate pain and tension.
- To do the McKenzie Neck Flexion, simply sit up straight in a chair.
- Slowly lower your chin towards your chest.
- There should be a nice stretch in your neck and shoulder muscles.
- You can even deepen the stretch by holding your hands on the back of your head.
- Hold this position for 30 seconds and then slowly raise your head back to the starting position.
- Repeat this exercise several times per day.
If you suffer from neck pain or stiffness, this stretch can help to provide relief.
This is also beneficial for those who experience headaches or migraines, as it can help to reduce the frequency and intensity of these episodes.
- Double Leg Lifts
Double leg lifts are a type of abdominal exercise that works the muscles in your abdomen and hips.
- The exercise is performed by lying on your back with your knees bent and feet flat on the floor.
- Tuck your hands under your buttocks.
- You then raise both legs straight above your waistline.
- Then slowly bring them downwards until they are slightly elevated above the floor. Make sure to keep them straight.
- Raise them again.
- Repeat this motion for 10-20 reps.
Here are a few tips to help you get the most out of your double leg lift workout:
- Make sure to tighten your abdominal muscles throughout the entire exercise.
This will help to target those muscles and ensure that you are getting the most out of the exercise.
- Take your time when performing the exercise. There is no need to rush through the motions. Focus on quality over quantity.
- If you are having trouble keeping your balance, try placing your hands on your hips or holding onto a nearby piece of furniture for support.
- Partial Sit-ups
A partial sit-up is a variation of the traditional sit-up that is performed by only partially lifting the torso off the ground.
This exercise can be used to target the abdominal muscles more specifically than a traditional sit-up.
How to do a partial sit-up:
- Lie on your back on the ground with your knees bent and feet flat on the floor.
- Place your hands behind your head or crossed over your chest.
- Use your abs to lift your upper body off the ground, only going up as far as you can while still keeping your lower back pressed firmly into the ground.
- Return to the starting position and repeat for 15-30 repetitions.
- Standing Hamstring Curl
The standing hamstring curl is a weight training exercise that primarily works the hamstrings, but also recruits the glutes and spinal erectors.
It is a single-joint exercise that requires balance and stabilization.
The standing hamstring curl can also be performed with body weight alone.
- The feet are hip-width apart with the toes pointing straight ahead.
- You can stand facing a wall or chair for balance.
- While keeping your thighs in a secure downward position, lift one heel backward towards your butt.
- Squeeze at the top for 1-3 seconds, then gently lower back down.
- Repeat with the left leg 10-20 times.
- Switch legs.
How Often Should You Do These Exercises?
Ideally, you should incorporate these into your daily exercise routine.
However, if that’s not possible, aim to do them at least three times a week.
Start by doing them slowly and then increase the speed and intensity as your muscles get used to the movements.
If you are doing them correctly, you should feel a slight burning sensation in your muscles after a few repetitions.
This is normal and means that the exercises are working.
However, if you feel pain, stop immediately and consult your chiropractor.
FAQs About Chiropractic Care
Can You Perform Chiropractic Care on Yourself?
Yes, you can perform chiropractic care on yourself by using various techniques such as spinal manipulation, massage, and mobilization.
It is important to consult with a chiropractor to learn the correct techniques and how to best perform them on yourself.
Do Chiropractors Give Exercises?
There is no one-size-fits-all answer to this question, as the exercises that a chiropractor may prescribe will vary depending on the individual’s specific condition.
However, some general exercises that a chiropractor may recommend include at-home stretches and strengthening exercises.
These exercises help to improve the range of motion, flexibility, and strength, in the human body which can ultimately lead to pain relief.
How Can I Adjust My Spine by Myself?
There are a few ways that you can adjust your spine by yourself.
One way is to use a tennis ball.
Place the tennis ball under your back and gently roll it around to relieve tension.
You can also use a foam roller to massage your back.
Place the roller on the floor and lie on top of it, letting it sink into your spine. Gently move up and down to massage the area.
Sources:
https://mindbodyspine.ca/exercises-and-stretches-for-low-back-and-leg-pain/
https://fitnessdrum.com/prayer-stretch/
https://www.lovetoknowhealth.com/fitness/seated-spinal-twist
https://flabfix.com/how-to-do-standing-hamstring-curl-properly/
Eric De Cremer
Eric is an NCCA-accredited Certified Personal Trainer and competitively trained powerlifter. Feel free to contact him anytime at edecremer@wildnswole.com!
Related Posts
The Flexion Row (What It Is and How It’s Done)
Horizontal Pull-Ups Are Harder Than Normal Ones, See Why
Shrugs Aren’t Necessary but Are Good for Extra Trap Growth
Side Delts (Here’s How Many Exercises To Do for Them)
Connect With Me
Disclosure: For some premium products I talk about on this website, I may receive compensation at no extra cost to you.
Blog Categories
Recent Posts
- The Flexion Row (What It Is and How It’s Done)
- Horizontal Pull-Ups Are Harder Than Normal Ones, See Why
- Shrugs Aren’t Necessary but Are Good for Extra Trap Growth
- Side Delts (Here’s How Many Exercises To Do for Them)
- Rear and Posterior Delts (Naming Is the Only Difference)
Popular Posts
Our Primary Techniques Explained


Here are some stretches and exercises that are recommended by our chiropractors that can be used at home and in between your appointments.
396 Cervical – Axial Extension (Chin Tucks)
- Place your pointer finger on your chin
- Guide your head back with your finger, tucking your chin down and towards your neck
Do 2 sets of 3 reps
357 Cervical Flexion Stretch
- Place your hand on top of your head
- Using your hand for assistance, bring your chin down and towards your chest. Hold for 4 seconds.
Do 2 sets of 3 reps.
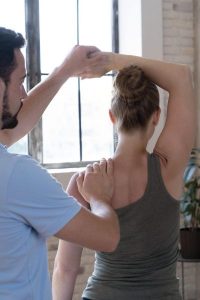
- Place your left hand on the right side of your head, reaching over the top of your head
- Gently pull your left ear towards your left shoulder
- Hold for 4 seconds
Do 2 sets of 3 reps.
363 Cervical Sidebend Stretch – Right
- Place your right hand on the left side of your head, reaching over the top of your head
- Gently pull your right ear towards your right shoulder
- Hold for 4 seconds
Do 2 sets of 3 reps.
- Place your hands behind your head, interlocking the fingers
- Push your head back against your hands
- Make sure your hands and head do not move.
- Hold for 4 seconds
Do 2 sets of 3 reps
375 Cervical – Flexion – Isometric
- Place your hand on your forehead
- Attempt to bring your chin towards your chest while resisting all motion with your hand
- Hold for 4 seconds
Do 2 sets of 3 reps.
384 Cervical – Sidebend – Left – Isometric
- Place your left hand on the left side of your head
- Attempt to bring your left ear towards your left shoulder while resisting all motion with your left hand
- Hold for 4 seconds
Do 2 sets of 3 reps
- Place your right hand on the right side of your head
- Attempt to bring your right ear towards your right shoulder while resisting all motion with your right hand
- Hold for 4 seconds
Do 2 sets of 3 reps
366 Doorway Stretch – External Rotation – 0 degrees
- Stand in a doorway and place your arms on the outside of the doorway, keeping your elbows at your side
- Slowly lean into the doorway while keeping your arms still
- Feel a stretch in the front of your chest
- Hold for 4 seconds
Do 2 sets of 3 reps
367 Doorway Stretch – External Rotation – 90 degrees
- Stand in a doorway and place your arms on the outside of the doorway with your arms above your head, bent at a 90-degree angle
- Slowly lean into the doorway, keeping your elbows bent
- Feel a stretch in the front of your chest
- Hold for 4 seconds
Do 2 sets of 3 reps
- Bring your left hand across your chest towards your opposite shoulder
- Place your right hand on the back of your left elbow
- Slowly bring your left arm across your chest, using the right hand for assistance.
- Hold for 4 seconds
- Repeat on the right side
Do 2 sets of 3 reps with both arms
- Stand on a level surface with your arms at your side
- Raise your shoulders towards your ears, keeping your arms straight
Do 2 sets of 3 reps
- Tie one end of the resistance band around a doorknob, with the door closed
- Gripping the other end of the resistance band, extend your arms back with the elbows bent
- Squeeze your shoulder blades together while pulling back
Do 2 sets of 3 reps
439 Extension – Standing – Resistance Band
- Tie the middle of the resistance band around a doorknob, with the door closed
- Gripping each end of the resistance band, extend your arms back while squeezing your shoulder blades together and keeping your arms straight
Do 2 sets of 3 reps
391 Shoulder Abduction – Resistance Band
- Step on one end of the resistance band
- Wrap the other end of the resistance band around the hand of the involved arm
- Raise your arm straight out to the side, parallel to the ground
Do 2 sets of 3 reps
The lower back plays a major role in our day-to-day life, and it can take a lot of strain. If your lower back is sore, Dynamic Spine Center can adjust your back to restore proper movement and function. In addition, Or Chiropractors may recommend some at-home lower back stretches and exercises for your lower back. By combining professional treatment at our practice with at-home treatment, you can experience significant mobility and function. We invite you to contact us at (758) 518-5000 to learn more about our lower back stretches and exercises and to set up your appointment with our caring team.
Lower Back Stretches
140 Knee to Chest – Double – Spine
- Lie on your back with your knees bent
- 2. Bring your knees to your chest and grab the back of your thighs
- Use your arms to bring your knees towards your chest
- Hold for 4 seconds
Do 2 sets of 3 reps
238 Abs – Straight – Arms Across Chest
- Lie on your back with your knees bent
- Fold your arms across your chest, each hand reaching for the opposite shoulder
- Curl your chest up and towards your knees
Do 2 sets of 3 reps
330 Bridge – Spine
- Lie on your back with your knees bent
- Roll your hips and tighten your abdominals
- Raise your buttocks up while keeping the abdominals tight
Do 2 sets of 3 reps
315 Supine Arm – Leg Raise – Alternating
- Lie on your back with your knees bent
- Roll your hips and tighten your abdominals
- Alternate raising your arm and the opposite leg up
Do 2 sets of 3 reps
220 Prone on Elbow Stretch
- Lie on your stomach with a pillow under your stomach
- Use your arms to raise up onto your elbows
- Make sure to keep your stomach on the pillow
Do 2 sets of 3 reps
296 Quadruped – Arm/Leg Raise – Alternating
- Place your hands and knees on a level surface
- Roll your hips to find your neutral spine position
- Alternate raising your arm and the opposite leg
Do 2 sets of 3 for each side
206 Cat/Camel
- Place your hands and knees on a firm, level surface
- Arch your back and return to a neutral or straight position
- Sag your back and return to a neutral or straight position
- Alternate arching and sagging your bag, returning to a neutral or straight position between each one
Do 2 sets of 3 reps
219 Prayer Stretch – Quadruped
- Place your hands and knees on a firm surface
- Slowly lean back and round your back to sit on your heels
- Feel a stretch to your back
- Hold for 4 seconds
Do 2 sets of 3 reps
116 Squats – Wall Slides
- Place a towel between your back and the wall. Stand about a foot’s distance out from the wall
- Lower your body by bending your knees, but keep your knees behind your toes
Do 2 sets of 3 reps
222 Trunk Extension Stretch – Standing
- Stand with your feet shoulder width apart
- Place your hands on your lower back
- Slowly bend backwards at your waist
- Hold for 4 seconds
Do 2 sets of 3 reps
223 Trunk Flexion Stretch – Seated
- Sit in a chair with your feet flat on the floor
- Slowly bend forward to feel a stretch in your back
- Attempt to bring your shoulders directly over your knees
- Hold for 4 seconds
Do 2 sets of 3 reps
226 Trunk Rotation Stretch – Seated
- Sit in a chair with your feet flat on the floor
- Rotate your trunk to the left
- Grab the left edge of the chair with your right arm, reaching across your chest
- Feel a stretch in your upper back
- Hold for 4 seconds
- Repeat for the other side
Do 2 sets of 3 reps for each side
224 Trunk Rotation, Knees Together Stretch – Supine
- Lie on your back with your knees bent
- Bring both knees to one side, and then the other
- Be sure to keep your upper body flat on the floor while rotating your knees
Do 2 sets of 3 reps
142 Piriformis Stretch – Quadruped
- Place your hands and knees on a flat surface
- Bring your involved leg across in front of your other knee
- Slowly sit back so that your involved knee is directly under the opposite shoulder
- Feel a stretch in your buttocks
- Hold for 4 seconds
Do 2 sets of 3 reps for each leg
129 Adductor Stretch – Supine
- Lie on your back with your knees bent
- Cross one leg over the other so that your involved ankle is resting on the other knee
- Use your hand to push down on your raised knee
- Feel a stretch to the inside of your thigh
- Hold for 4 seconds
Do 2 sets of 3 reps for each leg
134 Hamstring Stretch – Towel – Oppo. Leg Bent
- Lie on your back with your knees bent
- Raise your involved leg
- Place a towel over the sole of your foot and straighten your leg
- Feel a stretch to the back of the thigh
- Hold for 4 seconds
Do 2 sets of 3 reps
221 Prone on Hands Stretch
- Lie with a pillow under your stomach
- Raise up onto your hands, keeping your arms straight
- Make sure to keep your stomach on the pillow
- Hold for 4 seconds
Do 2 sets of 3 reps
Try these 23 chiropractice exercises in several sets of 6, 8, or 10 several times a day and you will be surprised at the amount of flexibility that returns in a couple of months.
1. PARTIAL SIT UP
Partial sit ups are recommended for people with back pain. The same muscle groups are worked out without putting stress on the lower back. You will start just like a regular sit up with your back on the floor, both feet on the floor, and your knees bent. Raise your head, neck, and shoulders off of the floor and hold that position for 5 seconds. This exercise will strengthen your core and is simple to do. Repeat as many times as you can, with a goal of increasing your reps each day.
2. KNEE TO CHEST
You start this exercise the same way like the partial sit up. Begin the exercise by drawing one of your knees to your chest, using both hands (only one foot is now on air). Hold to the count of 10, then slowly release it to the rest position. Do 4-5 repetitions, and then repeat with your other leg, then both legs at the same time. This exercise stretches your glutes and back.
3. HIP ROLL
Start this exercise flat on your back with your arms extended out to the side. Bend your knees and lift your feet off of the ground. You will now rotate your hips to the side so that your legs become parallel with the floor. Rotate from side to side for 5-10 repetitions. This is another core exercise that strengthens your abdominal muscles.
4. LOW BACK EXTENSION
Start by laying flat on your stomach with your hands to your side. Lift your head and upper body off of the ground by using the muscles in your lower back. Hold this position for 4-5 seconds and then lower yourself back down. Repeat 10-15 times.
5. CAT-CAMEL
Position yourself on all fours with hands directly beneath your shoulders and knees directly beneath your hips with your back straight. Use your abdominal muscles to push your back towards the ceiling, arching it like a cat. You should notice your head will point down towards the floor. Next, drop your back so that your lower back extends. Your head should raise when doing this. Make sure to keep your elbows straight the entire time, the only movement should be in your spine. Repeat this 12-15 times.
6. BACK EXTENSION
This exercise is best performed with a stability ball. Lay with your stomach on the stability ball with your hands behind your head. Tighten your abdominal muscles and use your lower back muscles by contracting your glutes to lift your shoulders and chest off the ball.
7. SUPERMAN
Lie face down with your arms extended above your head. Tighten your abdominal muscles and lift your arms and legs off the ground. It should like you are in a Superman like flying position. Hold this for about 30 seconds and then release. You may be tempted to hold your breath when clenching your abdominal muscles. DON’T! Control your breathing while holding this position.
8. DOUBLE LEG LIFTS
Using a stability ball, lay face down with your hands on the floor in front of the ball. Raise both legs off of the floor until your body is horizontal and hold the position for about 10 seconds. Lower your legs back down to the floor and repeat 5-10 times.
9. SPINAL ROTATION
While seated in a chair, reach one arm across your stomach and grasp the opposite side of the chair. Look over the shoulder while rotating the low- and mid-back. Hold for 15-30 seconds.
10. EXTERNAL SHOULDER ROTATION
Start by lying on your right side with your right arm folded under your head. Your upper left arm should be parallel to your torso, bent at the elbow so that you r forearm is lying across your stomach with your hand on the floor. By rotating your shoulder, raise your forearm so that it is perpendicular to the side of your body. Switch to your other side and repeat. This exercise can also be performed with a dumbbell.
11. INTERNAL SHOULDER ROTATION
Lay on your right side, like in the external shoulder rotation, but keep your right hand free this time. Keep your right arm next to your body and bend at the elbow. Rotate your shoulder to move your forearm. It will start flat on the floor, and then you will rotate it into your body so that your forearm is flat across your stomach. Repeat this motion 10-15 and use a dumbbell if you prefer.
12. LATERAL DELTOID RAISE
Start with your arms to the side of your body, palms facing the thighs. Tighten the abdominals, bend the knees slightly, and position the feet about shoulder-width apart. Raise your arms straight out to your side until they are shoulder height. Hold that position briefly, and slowly return your arms to your sides.
13. FRONT DELTOID RAISE
Start with your arms in front of your body, palms facing the thighs. Tighten the abdominals, bend the knees slightly, and position the feet about shoulder-width apart. Raise your arms straight out in front of you until they are shoulder height. Hold that position briefly, and slowly lower your arms.
14. SINGLE-ARM LAT PULLDOWN
Begin with both hands overhead holding an elastic resistance band. Engage the abdominals, bend the knees slightly, and position the feet about shoulder-width apart.
Pull downward to the side with one arm, adducting at the shoulder until the upper arm is next to the torso. Pause, then return slowly to the starting position. Keeps your arms slightly in front of the face to protect the back and shoulders.
15. STABILITY BALL PUSH-UPS
Start with the ball under your stomach and your hands on the floor in front of you. Roll forward slowly until your shins are balancing on the stability ball. Now perform pushups as your normally would by bending at the elbow.
16. SIDE LUMBAR BRIDGE
Lie on one side with your legs straight. Support the upper body by keeping the elbow directly beneath the shoulder. Being careful not to let the top hip rotate forward, engage the abdominals and use the torso to lift the hips. Hold this position for 10 to 15 seconds, maintaining a neutral neck and spine position.
17. SINGLE-LEG REVERSE CURL
Lie on your back with one knee flexed and foot flat on the floor and the other leg straight out slightly raised off the ground. Extend arms flat along body and maintain neutral alignment in the cervical spine.
Lift the working knee and leg in an upward diagonal direction over the belly button. Pause, then slowly lower the leg to the starting position. Repeat with other leg.
18. CRUNCH W/ STABILITY BALL
Lay down with your back on the stability ball and your hands behind your head or folded across your chest. Maintain a backwards-pelvic tilt and raise shoulder blades off the ball, return to the starting position, and repeat.
19. NECK FLEXION
Stand facing the wall and hold the stability ball at forehead height. Use your neck muscles to push your forehead into the stability ball. Relax and repeat.
20. NECK EXTENSION
Stand facing away from the wall and hold the stability ball behind your head. Push back of head into the ball.
21. NECK LATERAL
Stand sideways to the wall. Hold the stability ball above your shoulder at the side of your head. Push side of heads laterally into the ball.
22. NECK STRETCHES
Bring your ear to your shoulder
Let your neck to sit in that position for 5 to 7 seconds
Force your ear toward your shoulder.
Feel the stretch of your neck muscle on the opposite side.
Same principle as the exercise before…
Bring head back as if you are looking toward the ceiling.
Feel the stretch in the muscles located on the front part of your neck.
If this exercise causes dizziness, fainting or loss of balance… STOP THE EXERCISE AND CONTACT YOUR PHYSICIAN.
Rotate your head toward your (R or L) shoulder and then
Nod your head down and you will feel a stretch on the opposite side of which you are looking. Just hold for a few seconds and repeat.
23. NECK EXERCISES FOR STRENGTH
Put your hand on your forehead and force your forehead against your hand to provide resistance. You can do this in several sets of 6, 8, or 10 repetitions.
Place your hands on the back of your neck and force your head back while providing resistance with your hands.
Chiropractic Therapy
Our Primary Techniques Explained
More often than not, when we tell someone that we are a chiropractic office, they immediately associate our vocation with neck and/or back pain. What many do not realize, however, is that chiropractic is a health care modality that provides significantly more than just a solution for pain.
Chiropractic is a lifestyle that involves all aspects of wellness, including exercise, nutrition, personal development, and stress relief. We have been fortunate to work with people from all walks of life (including newborns, children, and adolescents) and the outcome has been miraculous.
Speciality Pilates equipment
We use a mix of specialised equipment including Pilates reformers, trapeze tables, fit balls, foam rollers and more. This equipment is designed specifically for clinical Pilates, promoting correct technique, appropriate resistance levels, and targeted exercises so you can really work your key areas and see results.
Our instructors also spend extra time teaching key muscle contraction techniques, which enables you to get more out of every Pilates workout session.


